📂 L05
├──  📄 index.html
├──  📄 exp.js
├──  📄 style.css
├──  📂 jspsych
└──  📂 images
     ├── 🖼️ 0_D_1.jpg
     ├── 🖼️ 0_D_2.jpg
└── etc.13 Lab 5: Mental Imagery
13.1 Research in Brief: Mental Rotation
13.1.1 The Research Area
Mental imagery refers to our ability to create and manipulate mental representations of visual, auditory, or other sensory information when the actual stimuli are not physically present. This cognitive ability allows us to “see” objects in our mind’s eye, rotate them mentally, and perform various operations on these internal representations.
Mental imagery research addresses fundamental questions about how our minds represent and process information. Can we manipulate mental images the same way we manipulate physical objects? Do our mental images share properties with actual perception? This area of research has profound implications for understanding creativity, problem-solving, spatial reasoning, and the relationship between thought and perception.
The study of mental imagery also connects to practical applications in fields requiring strong spatial skills, such as engineering, architecture, medicine, and the STEM disciplines. Understanding how people create and manipulate mental images helps us develop better training methods for spatial abilities and design more effective educational interventions.
13.1.1.1 Individual Differences in Imagery Ability
People vary dramatically in their ability to create and experience mental images. Most individuals report having moderately vivid mental imagery, but the extremes of this continuum reveal fascinating insights into the nature of mental representation. Aphantasia represents one extreme, where individuals report having little to no conscious visual imagery—when asked to imagine an apple, they may understand the concept but experience no visual mental image. At the opposite extreme, hyperphantasia describes exceptionally vivid mental imagery that can be nearly as clear and detailed as actual perception. People with hyperphantasia often report that their mental images are so vivid they can sometimes be confused with real perceptions.
These individual differences highlight that mental imagery is not a uniform cognitive ability but rather exists on a spectrum. Interestingly, people with aphantasia can still perform many spatial reasoning tasks successfully, suggesting they may use alternative cognitive strategies, while those with hyperphantasia may rely heavily on their vivid imagery for problem-solving and memory tasks.
13.1.2 The Research Design
The classic mental rotation paradigm developed by Shepard and Metzler (1971) employs a repeated measures experimental design where participants make same/different judgments about pairs of three-dimensional geometric figures presented at various orientations.
13.1.2.1 The Mental Rotation Methodology
Stimulus Presentation: Participants view pairs of line drawings depicting three-dimensional geometric objects. One object in each pair is rotated relative to the other by angles ranging from 0° to 180° in 20-degree increments. Some pairs show the same object at different orientations, while others show different (mirror-image) objects that cannot be made to match through rotation.
Task Requirements: For each pair, participants must decide whether the two objects are the same shape (and could be rotated to match exactly) or different shapes (mirror images that cannot be made to match through rotation). They respond by pulling different levers for “same” and “different” judgments.
The design includes two rotation conditions: picture-plane rotation where objects are rotated within the two-dimensional plane of the page (like rotating a flat picture), and depth rotation where objects are rotated in three-dimensional space (like rotating a physical object in depth).
13.1.2.2 Within-Subjects Comparisons
The repeated measures approach allows researchers to examine how rotation angle affects response time within the same participants. Each person responds to multiple rotation angles (0°, 20°, 40°, 60°, 80°, 100°, 120°, 140°, 160°, 180°), both rotation types (picture-plane and depth rotations), and both same and different pairs. This design controls for individual differences in spatial ability, response speed, and decision-making style while isolating the specific effect of mental rotation demands.
13.1.3 Key Findings
The repeated measures comparisons revealed a striking linear relationship between rotation angle and response time. Response time increased systematically with rotation angle, from approximately 1 second at 0° rotation to 4-5 seconds at 180° rotation. Both picture-plane and depth rotations showed nearly identical linear functions, suggesting similar underlying mental processes. While participants varied in overall speed, virtually all showed the same linear relationship between angle and response time, and participants remained accurate across all rotation angles, indicating they were genuinely performing mental rotation rather than guessing.
The within-subjects design revealed that picture-plane rotation (2D) showed average response times ranging from ~1.0 seconds (0°) to ~4.8 seconds (180°), while depth rotation (3D) ranged from ~1.0 seconds (0°) to ~5.2 seconds (180°). Both conditions showed approximately 1.6 seconds per 100° of rotation. The remarkable similarity between 2D and 3D rotation suggests that people can mentally rotate objects in three-dimensional space almost as efficiently as in two dimensions.
13.1.4 Implications
The linear relationship between rotation angle and response time provides strong evidence for analog mental representation. If mental images were stored as abstract, language-like descriptions (propositional codes), rotation angle should not systematically affect processing time. Instead, the data suggest that people mentally rotate images through intermediate positions, just as they would rotate physical objects.
The findings support analog coding theories which propose that mental images preserve spatial relationships and can be manipulated using processes similar to those used with physical objects. The systematic increase in response time with rotation angle indicates that mental rotation involves a continuous process rather than discrete computational steps.
This repeated measures research demonstrates that mental imagery operates according to spatial principles similar to those governing physical object manipulation. The consistent linear relationship across participants and rotation types suggests that mental rotation reflects a fundamental property of spatial cognition rather than an experimental artifact.
The paradigm has become a cornerstone for studying individual differences in spatial ability, with applications ranging from understanding gender differences in spatial skills to developing training programs for professions requiring strong spatial reasoning. The findings also provide crucial evidence that mental imagery involves more than simple verbal descriptions—it appears to engage spatial processing systems that mirror those used in actual perception and action.
The mental rotation task continues to be widely used in cognitive psychology, neuroscience, and educational research as a reliable measure of spatial visualization ability and a window into the nature of mental representation. Importantly, even individuals with aphantasia can often perform mental rotation tasks successfully, though they may use different cognitive strategies than those who experience vivid mental imagery.
13.1.5 Further Reading
Shepard, R. N., & Metzler, J. (1971). Mental rotation of three-dimensional objects. Science, 171(3972), 701-703.
Monzel, M., & Reuter, M. (2023). Where’s Wanda? The influence of visual imagery vividness on visual search speed measured by means of hidden object pictures. Attention, Perception, & Psychophysics, 1-6.
Beaman, C. P., Powell, K., & Rapley, E. (2015). Rapid Communication: Want to block earworms from conscious awareness? B (u) y gum!.
Bainbridge, W. A., Pounder, Z., Eardley, A. F., & Baker, C. I. (2021). Quantifying aphantasia through drawing: Those without visual imagery show deficits in object but not spatial memory. Cortex, 135, 159-172.
Agnew, M. (1922). The auditory imagery of great composers. Psychological Monographs, 31(1), 279.
13.2 Program a Mental Rotation Task
In this exercise, we’re going to program a mental rotation task with multiple blocks of trials. Across the blocks of trials, we’ll manipulate the difficulty of the task, starting with easy trials, where the rotation differences are larger, to more difficult trials, where the rotation differences are smaller.
Our initial folder structure looks similar to previous labs, except now we have a folder that contains all of our images. Each image shows a pair of 3d objects.
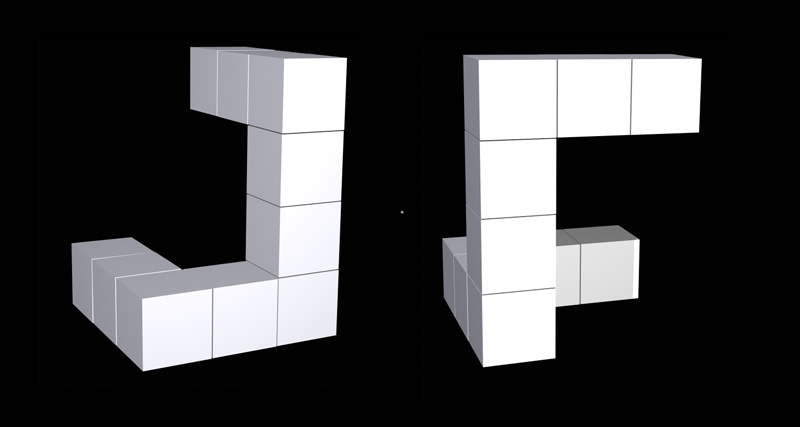
The image names tell us what the rotation difference is between the two and whether they are in fact the “same” image or “different” (a mirrored version). 0_S_1.jpg, for example, tells us that this image contains 0 degree difference, they are the same image (“S”) and it is image 1. We have six images for every rotation and same/different combination. For example, this image below has a 100 degree rotation difference, but they are the same image:
13.2.1 Initiate jsPsych
Let’s jump right in by loading and initiating jsPsych with a welcome screen.
I’ve decided to use the jsPsychImageResponse for the study phase and the for the test phase so I’ve loaded them both in the <head>. We’re also going to need our jsPsychPreload plugin to preload all of our images before the experiment begins.
<!DOCTYPE html>
<html>
<head>
    <title>Lab 4: Mental Imagery</title>
    <!-- jsPsych -->
    <script src="jspsych/jspsych.js"></script>
    <link href="jspsych/jspsych.css" rel="stylesheet" type="text/css" />

    <!-- jPsych plugins -->
    <script src="jspsych/plugin-html-keyboard-response.js"></script>
    <script src="jspsych/plugin-preload.js"></script>
    <script src="jspsych/plugin-image-keyboard-response.js"></script>

    <!-- custom CSS -->
    <link href="style.css" rel="stylesheet" type="text/css" />
</head>
<body>
  <!-- custom JS -->
  <script src="exp.js"></script>
</body>
</html>
Live JsPsych Demo
Click inside the demo to activate demo
13.2.2 Add a mental rotation trial
We’re going to start by adding a single mental rotation trial to see what it looks like. We’re going to use our timeline method. So, I’ll put the trial inside a timeline array and add a single image to the timeline_variables parameter. We’ll use our jsPsych.timelineVariable("image") to refer to that image in our stimulus.
We also need to add our new block easy_block to the jsPsych.run() function. Reminder: Don’t forget to add the comma on line 25 before adding the easy_block.
<!DOCTYPE html>
<html>
<head>
    <title>Lab 4: Mental Imagery</title>
    <!-- jsPsych -->
    <script src="jspsych/jspsych.js"></script>
    <link href="jspsych/jspsych.css" rel="stylesheet" type="text/css" />

    <!-- jPsych plugins -->
    <script src="jspsych/plugin-html-keyboard-response.js"></script>
    <script src="jspsych/plugin-preload.js"></script>
    <script src="jspsych/plugin-image-keyboard-response.js"></script>

    <!-- custom CSS -->
    <link href="style.css" rel="stylesheet" type="text/css" />
</head>
<body>
  <!-- custom JS -->
  <script src="exp.js"></script>
</body>
</html>
// 1. Initialize jsPsych
const jsPsych = initJsPsych();
// 2. Define our trials
const welcome = {
type: jsPsychHtmlKeyboardResponse,
stimulus: `Welcome to the Experiment! Press any key to begin.`,
choices: "ALL_KEYS"
}
const easy_block = {
timeline: [
{
type: jsPsychImageKeyboardResponse,
stimulus: jsPsych.timelineVariable("image")
}
],
timeline_variables: [
{image: "images/0_S_1.jpg"}
]
}
// 3. Run jsPsych with our trials
jsPsych.run([
welcome,
easy_block
]);
Live JsPsych Demo
Click inside the demo to activate demo
13.2.3 Update the trial parameters
Now that we have a simple trial, we make some necessary changes to update the parameters to operate properly. I’ve added a few sensible options here, setting the prompt and choices so participants need to press “S” or “D”.
I also noticed the image was too large, so I changed stimulus_width to be 300px and then added a post_trial_gap of 250ms. This will add a bit of a gap between trials.
Reminder: Don’t forget to add the comma on line 25 before adding the new parameters
<!DOCTYPE html>
<html>
<head>
    <title>Lab 4: Mental Imagery</title>
    <!-- jsPsych -->
    <script src="jspsych/jspsych.js"></script>
    <link href="jspsych/jspsych.css" rel="stylesheet" type="text/css" />

    <!-- jPsych plugins -->
    <script src="jspsych/plugin-html-keyboard-response.js"></script>
    <script src="jspsych/plugin-preload.js"></script>
    <script src="jspsych/plugin-image-keyboard-response.js"></script>

    <!-- custom CSS -->
    <link href="style.css" rel="stylesheet" type="text/css" />
</head>
<body>
  <!-- custom JS -->
  <script src="exp.js"></script>
</body>
</html>
// 1. Initialize jsPsych
const jsPsych = initJsPsych();
// 2. Define our trials
const welcome = {
type: jsPsychHtmlKeyboardResponse,
stimulus: `Welcome to the Experiment! Press any key to begin.`,
choices: "ALL_KEYS"
}
const easy_block = {
timeline: [
{
type: jsPsychImageKeyboardResponse,
stimulus: jsPsych.timelineVariable("image"),
prompt: `<p>Press "S" if the images are the same or "D", if they are different</p>`,
choices: ["s", "d"],
stimulus_width: 300,
post_trial_gap: 250
}
],
timeline_variables: [
{image: "images/0_S_1.jpg"}
]
}
// 3. Run jsPsych with our trials
jsPsych.run([
welcome,
easy_block
]);
Live JsPsych Demo
Click inside the demo to activate demo
13.2.4 Add additional trials
Let’s add some more trials. This is the “Easy” block, so we’ll just use the 0-degree images for this one.
I’ve also set randomize_order: true so that they appear in a random order.
<!DOCTYPE html>
<html>
<head>
    <title>Lab 4: Mental Imagery</title>
    <!-- jsPsych -->
    <script src="jspsych/jspsych.js"></script>
    <link href="jspsych/jspsych.css" rel="stylesheet" type="text/css" />

    <!-- jPsych plugins -->
    <script src="jspsych/plugin-html-keyboard-response.js"></script>
    <script src="jspsych/plugin-preload.js"></script>
    <script src="jspsych/plugin-image-keyboard-response.js"></script>

    <!-- custom CSS -->
    <link href="style.css" rel="stylesheet" type="text/css" />
</head>
<body>
  <!-- custom JS -->
  <script src="exp.js"></script>
</body>
</html>
// 1. Initialize jsPsych
const jsPsych = initJsPsych();
// 2. Define our trials
const welcome = {
type: jsPsychHtmlKeyboardResponse,
stimulus: `Welcome to the Experiment! Press any key to begin.`,
choices: "ALL_KEYS"
}
const easy_block = {
timeline: [
{
type: jsPsychImageKeyboardResponse,
stimulus: jsPsych.timelineVariable("image"),
prompt: `<p>Press "S" if the images are the same or "D", if they are different</p>`,
choices: ["s", "d"],
stimulus_width: 300,
post_trial_gap: 250
}
],
timeline_variables: [
{image: "images/0_S_1.jpg"},
{image: "images/0_S_2.jpg"},
{image: "images/0_D_1.jpg"},
{image: "images/0_D_2.jpg"}
],
randomize_order: true
}
// 3. Run jsPsych with our trials
jsPsych.run([
welcome,
easy_block
]);
Live JsPsych Demo
Click inside the demo to activate demo
13.2.5 Add a fixation between trials
Now that we have a series of trials, it becomes clear that we should have a break between each. Let’s add a fixation cross before each trial using the jsPsychHtmlKeyboardResponse plugin.
<!DOCTYPE html>
<html>
<head>
    <title>Lab 4: Mental Imagery</title>
    <!-- jsPsych -->
    <script src="jspsych/jspsych.js"></script>
    <link href="jspsych/jspsych.css" rel="stylesheet" type="text/css" />

    <!-- jPsych plugins -->
    <script src="jspsych/plugin-html-keyboard-response.js"></script>
    <script src="jspsych/plugin-preload.js"></script>
    <script src="jspsych/plugin-image-keyboard-response.js"></script>

    <!-- custom CSS -->
    <link href="style.css" rel="stylesheet" type="text/css" />
</head>
<body>
  <!-- custom JS -->
  <script src="exp.js"></script>
</body>
</html>
// 1. Initialize jsPsych
const jsPsych = initJsPsych();
// 2. Define our trials
const welcome = {
type: jsPsychHtmlKeyboardResponse,
stimulus: `Welcome to the Experiment! Press any key to begin.`,
choices: "ALL_KEYS"
}
const easy_block = {
timeline: [
{
type: jsPsychHtmlKeyboardResponse,
stimulus: `<p style="font-size:48px">+</p>`,
choices: "NO_KEYS",
trial_duration: 750,
post_trial_gap: 250
},
{
type: jsPsychImageKeyboardResponse,
stimulus: jsPsych.timelineVariable("image"),
prompt: `<p>Press "S" if the images are the same or "D", if they are different</p>`,
choices: ["s", "d"],
stimulus_width: 300,
post_trial_gap: 250
}
],
timeline_variables: [
{image: "images/0_S_1.jpg"},
{image: "images/0_S_2.jpg"},
{image: "images/0_D_1.jpg"},
{image: "images/0_D_2.jpg"}
],
randomize_order: true
}
// 3. Run jsPsych with our trials
jsPsych.run([
welcome,
easy_block
]);
Live JsPsych Demo
Click inside the demo to activate demo
13.2.6 Preload Images
Now, for an important step. If you tried the demos in the previous steps, you probably found that the images lagged. That’s because this is being hosted on the internet and we didn’t preload our images! If you’re running the code locally, you probably did not notice any lag, because nothing is being sent over the internet connection.
Let’s preload our images! I’ve already loaded the preload plugin in the HTML <head>, we just need to add it to our experiment.
<!DOCTYPE html>
<html>
<head>
    <title>Lab 4: Mental Imagery</title>
    <!-- jsPsych -->
    <script src="jspsych/jspsych.js"></script>
    <link href="jspsych/jspsych.css" rel="stylesheet" type="text/css" />

    <!-- jPsych plugins -->
    <script src="jspsych/plugin-html-keyboard-response.js"></script>
    <script src="jspsych/plugin-preload.js"></script>
    <script src="jspsych/plugin-image-keyboard-response.js"></script>

    <!-- custom CSS -->
    <link href="style.css" rel="stylesheet" type="text/css" />
</head>
<body>
  <!-- custom JS -->
  <script src="exp.js"></script>
</body>
</html>
// 1. Initialize jsPsych
const jsPsych = initJsPsych();
// 2. Define our trials
const welcome = {
type: jsPsychHtmlKeyboardResponse,
stimulus: `Welcome to the Experiment! Press any key to begin.`,
choices: "ALL_KEYS"
}
const preload = {
type: jsPsychPreload,
images: [
"images/0_S_1.jpg",
"images/0_S_2.jpg",
"images/0_D_1.jpg",
"images/0_D_2.jpg"
]
}
const easy_block = {
timeline: [
{
type: jsPsychHtmlKeyboardResponse,
stimulus: `<p style="font-size:48px">+</p>`,
choices: "NO_KEYS",
trial_duration: 750,
post_trial_gap: 250
},
{
type: jsPsychImageKeyboardResponse,
stimulus: jsPsych.timelineVariable("image"),
prompt: `<p>Press "S" if the images are the same or "D", if they are different</p>`,
choices: ["s", "d"],
stimulus_width: 300,
post_trial_gap: 250
}
],
timeline_variables: [
{image: "images/0_S_1.jpg"},
{image: "images/0_S_2.jpg"},
{image: "images/0_D_1.jpg"},
{image: "images/0_D_2.jpg"}
],
randomize_order: true
}
// 3. Run jsPsych with our trials
jsPsych.run([
preload,
welcome,
easy_block
]);
Live JsPsych Demo
Click inside the demo to activate demo
13.2.7 Add a Medium Difficulty Block
Let’s up the difficulty and create a second block of trials that has some more difficult trials.
There are three things that need to happen:
- Create a
medium_blocktimeline with different images (otherwise it’s identical to theeasy_block) [lines 52 to 77] - Add our new images to the
preload[lines 17 to 21] - Add our
medium_blockto thejsPsych.run()function [lines 83 to 84]
<!DOCTYPE html>
<html>
<head>
    <title>Lab 4: Mental Imagery</title>
    <!-- jsPsych -->
    <script src="jspsych/jspsych.js"></script>
    <link href="jspsych/jspsych.css" rel="stylesheet" type="text/css" />

    <!-- jPsych plugins -->
    <script src="jspsych/plugin-html-keyboard-response.js"></script>
    <script src="jspsych/plugin-preload.js"></script>
    <script src="jspsych/plugin-image-keyboard-response.js"></script>

    <!-- custom CSS -->
    <link href="style.css" rel="stylesheet" type="text/css" />
</head>
<body>
  <!-- custom JS -->
  <script src="exp.js"></script>
</body>
</html>
// 1. Initialize jsPsych
const jsPsych = initJsPsych();
// 2. Define our trials
const welcome = {
type: jsPsychHtmlKeyboardResponse,
stimulus: `Welcome to the Experiment! Press any key to begin.`,
choices: "ALL_KEYS"
}
const preload = {
type: jsPsychPreload,
images: [
"images/0_S_1.jpg",
"images/0_S_2.jpg",
"images/0_D_1.jpg",
"images/0_D_2.jpg",
"images/50_S_1.jpg",
"images/50_S_2.jpg",
"images/50_D_1.jpg",
"images/50_D_2.jpg"
]
}
const easy_block = {
timeline: [
{
type: jsPsychHtmlKeyboardResponse,
stimulus: `<p style="font-size:48px">+</p>`,
choices: "NO_KEYS",
trial_duration: 750,
post_trial_gap: 250
},
{
type: jsPsychImageKeyboardResponse,
stimulus: jsPsych.timelineVariable("image"),
prompt: `<p>Press "S" if the images are the same or "D", if they are different</p>`,
choices: ["s", "d"],
stimulus_width: 300,
post_trial_gap: 250
}
],
timeline_variables: [
{image: "images/0_S_1.jpg"},
{image: "images/0_S_2.jpg"},
{image: "images/0_D_1.jpg"},
{image: "images/0_D_2.jpg"}
],
randomize_order: true
}
const medium_block = {
timeline: [
{
type: jsPsychHtmlKeyboardResponse,
stimulus: `<p style="font-size:48px">+</p>`,
choices: "NO_KEYS",
trial_duration: 750,
post_trial_gap: 250
},
{
type: jsPsychImageKeyboardResponse,
stimulus: jsPsych.timelineVariable("image"),
prompt: `<p>Press "S" if the images are the same or "D", if they are different</p>`,
choices: ["s", "d"],
stimulus_width: 300,
post_trial_gap: 250
}
],
timeline_variables: [
{image: "images/50_S_1.jpg"},
{image: "images/50_S_2.jpg"},
{image: "images/50_D_1.jpg"},
{image: "images/50_D_2.jpg"}
],
randomize_order: true
}
// 3. Run jsPsych with our trials
jsPsych.run([
preload,
welcome,
easy_block,
medium_block
]);
Live JsPsych Demo
Click inside the demo to activate demo
13.2.8 Add some additional instruction and debrief screens
Before we finish, let’s tidy up our experiment by providing a few additional trials that happen between each block and one that tells the participant the experiment is finished at the end.
<!DOCTYPE html>
<html>
<head>
    <title>Lab 4: Mental Imagery</title>
    <!-- jsPsych -->
    <script src="jspsych/jspsych.js"></script>
    <link href="jspsych/jspsych.css" rel="stylesheet" type="text/css" />

    <!-- jPsych plugins -->
    <script src="jspsych/plugin-html-keyboard-response.js"></script>
    <script src="jspsych/plugin-preload.js"></script>
    <script src="jspsych/plugin-image-keyboard-response.js"></script>

    <!-- custom CSS -->
    <link href="style.css" rel="stylesheet" type="text/css" />
</head>
<body>
  <!-- custom JS -->
  <script src="exp.js"></script>
</body>
</html>
// 1. Initialize jsPsych
const jsPsych = initJsPsych();
// 2. Define our trials
const welcome = {
type: jsPsychHtmlKeyboardResponse,
stimulus: `Welcome to the Experiment! Press any key to begin.`,
choices: "ALL_KEYS"
}
const preload = {
type: jsPsychPreload,
images: [
"images/0_S_1.jpg",
"images/0_S_2.jpg",
"images/0_D_1.jpg",
"images/0_D_2.jpg",
"images/50_S_1.jpg",
"images/50_S_2.jpg",
"images/50_D_1.jpg",
"images/50_D_2.jpg"
]
}
const easy_intro = {
type: jsPsychHtmlKeyboardResponse,
stimulus: `
<p>First, you will complete a block of easy trials.</p>
<p>When you are ready for the first block, press any key</p>
`,
choices: "ALL_KEYS"
}
const easy_block = {
timeline: [
{
type: jsPsychHtmlKeyboardResponse,
stimulus: `<p style="font-size:48px">+</p>`,
choices: "NO_KEYS",
trial_duration: 750,
post_trial_gap: 250
},
{
type: jsPsychImageKeyboardResponse,
stimulus: jsPsych.timelineVariable("image"),
prompt: `<p>Press "S" if the images are the same or "D", if they are different</p>`,
choices: ["s", "d"],
stimulus_width: 300,
post_trial_gap: 250
}
],
timeline_variables: [
{image: "images/0_S_1.jpg"},
{image: "images/0_S_2.jpg"},
{image: "images/0_D_1.jpg"},
{image: "images/0_D_2.jpg"}
],
randomize_order: true
}
const medium_intro = {
type: jsPsychHtmlKeyboardResponse,
stimulus: `
<p>Great! Now you will complete a block of more difficult trials.</p>
<p>When you are ready for the this block, press any key</p>
`,
choices: "ALL_KEYS"
}
const medium_block = {
timeline: [
{
type: jsPsychHtmlKeyboardResponse,
stimulus: `<p style="font-size:48px">+</p>`,
choices: "NO_KEYS",
trial_duration: 750,
post_trial_gap: 250
},
{
type: jsPsychImageKeyboardResponse,
stimulus: jsPsych.timelineVariable("image"),
prompt: `<p>Press "S" if the images are the same or "D", if they are different</p>`,
choices: ["s", "d"],
stimulus_width: 300,
post_trial_gap: 250
}
],
timeline_variables: [
{image: "images/50_S_1.jpg"},
{image: "images/50_S_2.jpg"},
{image: "images/50_D_1.jpg"},
{image: "images/50_D_2.jpg"}
],
randomize_order: true
}
const debrief = {
type: jsPsychHtmlKeyboardResponse,
stimulus: `
<p>The experiment is now complete.</p>
<p>Thank you for completing our study, you may now safely close the browser.</p>
`,
choices: "ALL_KEYS"
}
// 3. Run jsPsych with our trials
jsPsych.run([
preload,
welcome,
easy_intro,
easy_block,
medium_intro,
medium_block,
debrief
]);
Live JsPsych Demo
Click inside the demo to activate demo
13.3 Stretch Goals
13.3.1 Add Instructions
Use the jsPsychInstructions plugin to add these instructions to the experiment. Do your best to style it the way it is styled here.
Reminder: Don’t forget to add the instructions plugin to your <head>!
Instructions:
Page 1:
In this experiment, you will see two images of 3D objects.
Your task is to indicate whether the two objects are the same or if they are different.
Page 2:
The objects may be rotated at different angles, so you will need to mentally rotate them to compare their shapes.
Press ‘S’ if the objects are the same shape.
Press ‘D’ if the objects are different shapes.
Try to respond as quickly and accurately as possible.
Page 3:
Example - SAME objects:
Insert Image Here: “images/100_S_1.jpg”
These objects are the same shape, just rotated differently.
You would press ‘S’ for this pair.
Page 4:
Example - DIFFERENT objects:
Insert Image Here: “images/100_D_1.jpg”
These objects are different shapes.
You would press ‘D’ for this pair.
Click ‘Next’ when you’re ready to begin the experiment.
13.3.2 Add a third “Mixed” block of trials
In a proper mental rotation task, we need to mix in trials of all rotations. Let’s add a third block called mixed_block that has one of each type of rotation:
"images/0_S_3.jpg"
"images/0_D_3.jpg"
"images/50_S_3.jpg"
"images/50_D_3.jpg"
"images/100_S_3.jpg"
"images/100_D_3.jpg"
"images/150_S_3.jpg"
"images/150_D_3.jpg"
Make sure you add a mixed_intro to tell the participant that they are about to begin the experimental trials.
13.3.3 Change the style
Since the mental rotation images are white on a black background, try updating the style.css file to make the whole experiment have a black background and white font.